Introduction
There are 4 stages to configuring a custom image for use in Change360:
- Create and configure a VM in Azure
- Sysprep the configured VM
- Capture the VM as a Managed Image
- Configure the custom image in Rimo3
Prerequisites
- To use custom images in Change360 the Rimo3 Gateway VM's Managed Identity requires Reader Role on the Azure Managed Image
- Rimo3 does not currently support the Trusted Launch VM Type
Create and configure a VM in Azure
Before you can create a Manage Image in Azure you need to create and configure a VM to represent the build that you want to use for testing.
The VM should be created with Security Type set to Standard
More Information:
- Quickstart - Create a Windows VM in the Azure portal - Azure Virtual Machines | Microsoft Docs
- Prepare a Windows VHD to upload to Azure - Azure Virtual Machines | Microsoft Docs
Sysprep the configured VM
Once the VM has been configured as required it needs to be Sysprepped to remove all personal information and prepare the VM to be used as an image
After the VM has been Sysprepped it is considered generalized and cannot be restarted. This process can't be reversed so if you want to keep the customized VM functional then create a copy of the VM first and Sysprep the copy instead.
If you have enabled encryption on any drives on the VM they should be decrypted before running Sysprep. If you plan to run Sysprep before uploading your virtual hard disk (VHD) to Azure for the first time, make sure you have prepared your VM.
To generalize your Windows VM, follow these steps:
-
Sign in to the configured VM.
-
Open an elevated Command Prompt.
-
Delete the C:\Windows\Panther folder
NOTE: If the folder cannot be deleted because files are in use, restart the VM and try again. -
Change to the %windir%\system32\sysprep folder and run sysprep.exe.
-
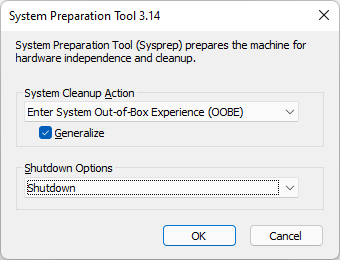
For System Cleanup Action select Enter System Out-of-Box Experience (OOBE) and then select the Generalize check box.
-
For Shutdown Options, select Shutdown.
-
Select OK.
-
When Sysprep completes, it will shut the VM down.
NOTE: Sysprep can finish in as little as 5mins for basic images, or take as long as 15-30mins for complex and heavily customised domain joined images with lots of applications, drivers and Windows Updates installed. Sysprep may appear to hang even though it is still working. -
To optionally optimize your image to improve the first boot experience:
- Detach the disk from the configured VM
- Mount it as a data disk to another VM
- From the other VM run DISM with the /optimize-image parameter, where D: is path to the disk of the configure VM:


-
Detach the configured VM’s disk and reattach it to the configured VM
Once Sysprep has finished, set the status of the configured VM to Generalized.

If you do not do this it will not be possible to capture the image in the next stage.
Capture the VM as a Managed Image
-
Find the configured VM in the Azure Portal and select it.
-
On the Virtual machine page select Capture.
-
The Create image page appears, enter a name for the Managed Image or accept the pre-populated name.
-
For Resource group, select the resource group that hosts the Rimo3 customer tenant linking components.
- If you do not select the Resource Group where the Rimo3 components are hosted then you will need to explicitly configure access to the VM, in the Access Settings below.
-
To delete the source VM after the managed image has been created, select Automatically delete this virtual machine after creating the image.
-
If you want the ability to use the image in any availability zone, select On for Zone resiliency.
-
Select Create to create the managed image.
Access Settings
If you are using an exiting managed image or you created the managed image in a resource group other than the one hosting the Rimo3 tenant linking components then complete the following step to ensure appropriate access to the managed image.
- Find the managed image under Images in the Azure Portal
- Select the managed image and then select Access Control (IAM) from the menu on the left hand side.
- Under Grant access to this resource select Add role assignment
- Select Reader on the Role tab and click next
- On the Members tab select Managed Identity
- Select + Select Members
- In the Select managed identities pane ensure that the correct Subscription is selected and under Managed Identity seklect Virtual Machines.
- In the Select text box search for the Rimo3 Gateway device, this typically starts with r3 and ends in -gw-vm.
- Select the Gateway VM from the search results and click on on Select
- Click on Next
- On the Review + assign tab click on the Review + assign button
- nter the Resource ID saved in step 2 above.
- Click on Save
- The customer image will now be available to select as an Operating System for testing.
- Ensure that there are no sequences running or queued and restart the Gateway VM for the the changes to take effect.
If there are any sequences running when the Gateway VM is restarted these will be cancelled.
Configure the custom image in Change360
In this stage you will select a managed image to be used for creating Task Runners in Change360.
- Once the image has been created find it under Images in the Azure Portal. Select the managed image and then select properties from the menu on the left hand side.
- Copy the Resource ID and save it for use in step 5.
- Login to your Chanage360 workspace, you must be at least an Admin for the workspace to complete the following steps.
- From the Extended menu select Custom Images under the Test Environments section
- On the Customer Images page, select Add
- Give the Image a meaningful name as this is the name that will be displayed when selecting the custom image to use for testing.
- Select the OS that the image uses

- Enter the Resource ID saved in step 2 above.
- Click on Save
- The custom image will now be available to select as an Operating System for testing